🍿 3 min. read
Setting Up Shell with zsh and Autosuggestions
This post is an overview of how I recently migrated my bash history and settings from Bash to zsh and set up autosuggestions for my terminal. For a while whenever I opened a new terminal window,the below message greeted me to prompt me to migrate to zsh, which is the default shell for newer macOS versions (as of macOS Catalina):
1*2              *3            * | *4      * * * \|O|/ * * *5       \o\o\o|O|o/o/o/6       (<><><>O<><><>)7        '==========='8
9The default interactive shell is now zsh.10To update your account to use zsh, please run `chsh -s /bin/zsh`.11For more details, please visit https://support.apple.com/kb/HT208050.
Table of Contents
Migrating to zsh while carrying over some of your bash settings is a bit more involved then just running chsh -s /bin/zsh. When I was migrating to zsh I knew that I wanted to be able to use autosuggestions out of the box to auto-populate and enable more robust re-use of commands than setting up aliases. Aliases involve mapping a shorter or more memorable command to another.
Set zsh as default for macOS account
Update macOS account to use zsh as the default by running chsh -s /bin/zsh. After running this command your terminal should look different. For me , after running this command then when I opened a new terminal window my terminal looked different as I prior to converting to zsh I had the Yoncé Bash It theme set up which zsh doesn't support.
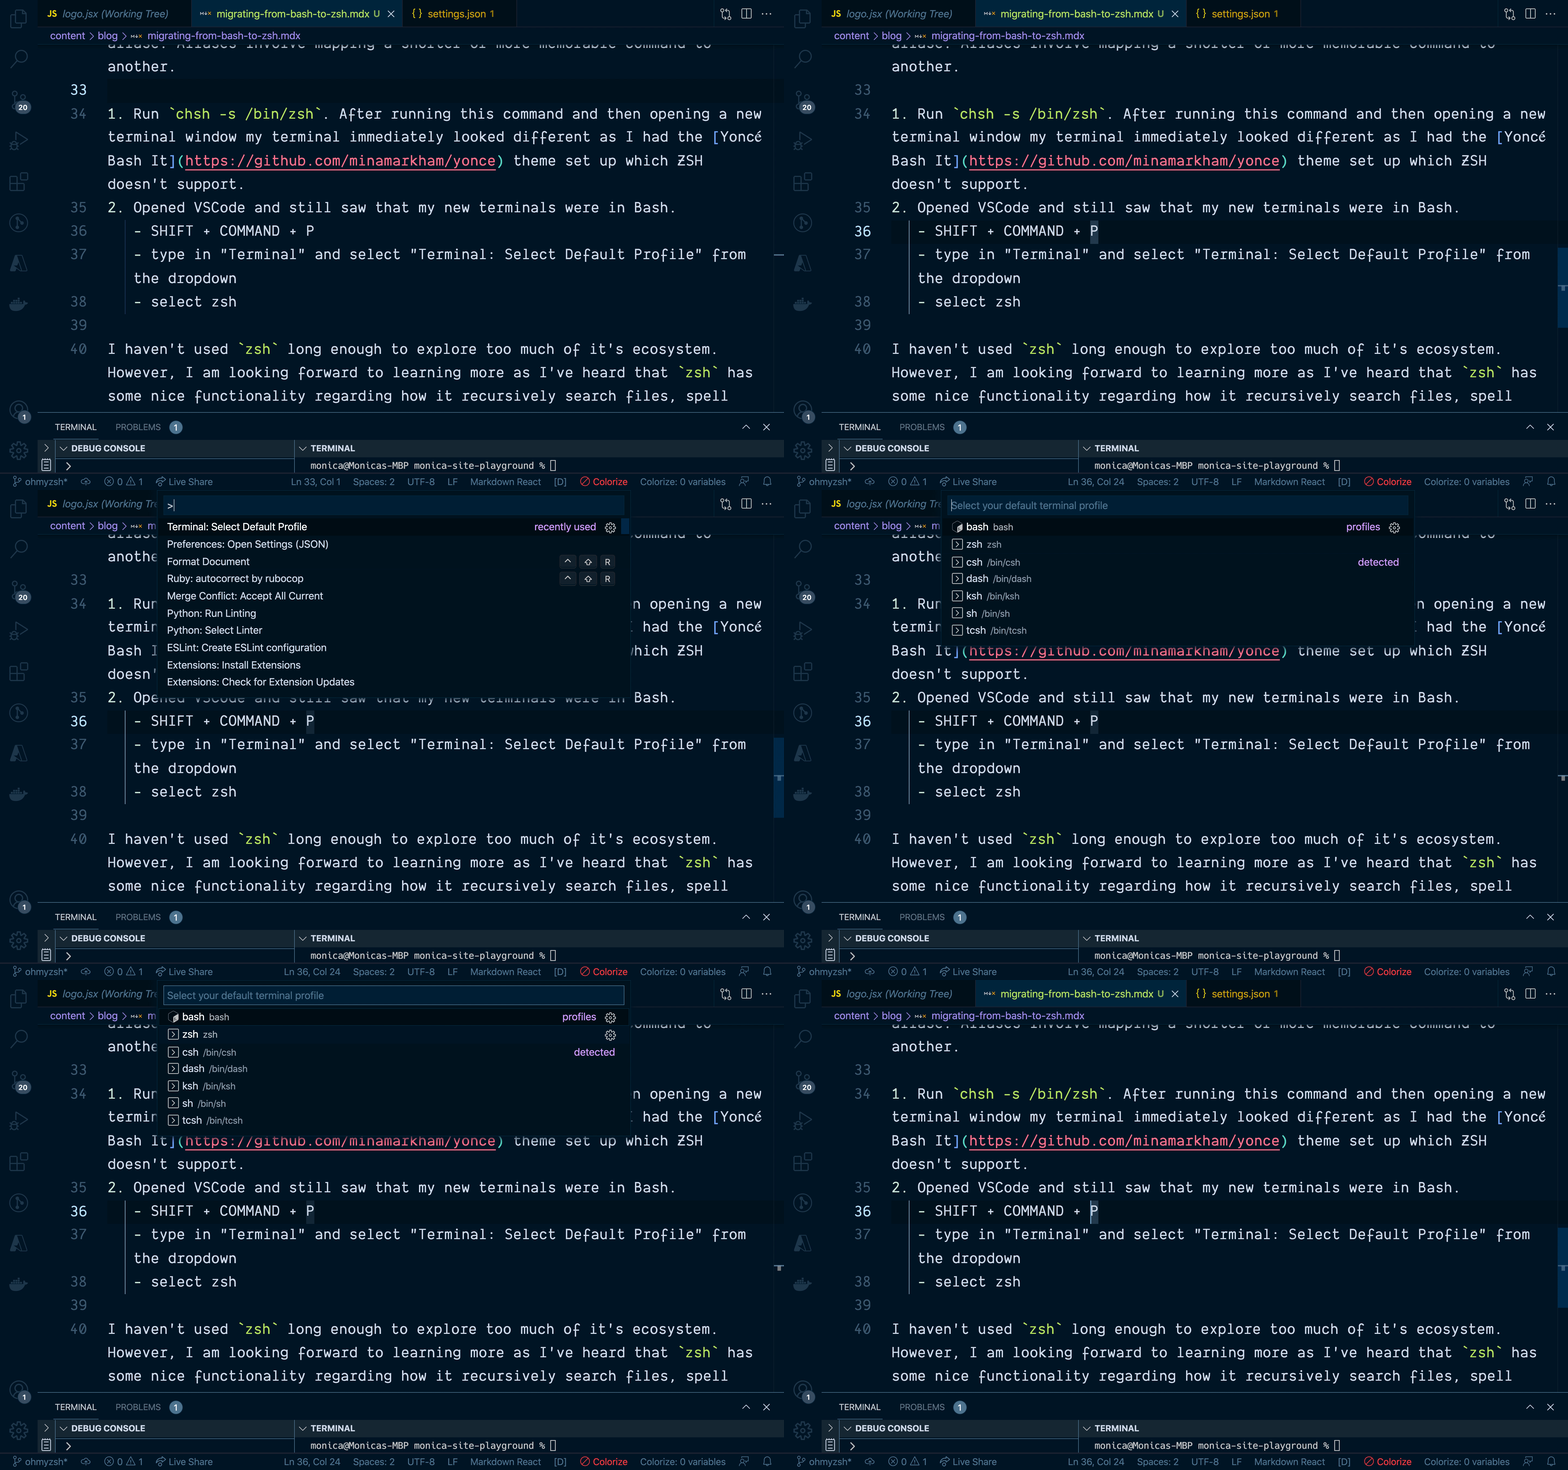
Set zsh as the default for VSCode
If you use VSCode or another IDE with an integrate terminal then you may need to update it to use zsh as the default for the integrated terminal or else it will default to the previous default.
- Open VSCode
- Press
SHIFT + COMMAND + P - type in "Terminal" and select "Terminal: Select Default Profile" from the dropdown
- select zsh
- new terminals opened in VSCode should now use zsh.

Migrate information from bash to zsh
Copy bash history over to zsh
It is helpful to migrate over some of the contents from ~/.bash_history in order to better take advantage of zsh's autocomplete features shortly after migrating. Bash has a file ~/.bash_history that stores previously run commands and zsh has ~/.zsh_history.
Copy environment variables from Bash to zsh
zsh should be aware of any relevant env variables that are in ~./bash_profile. Env variables in zsh live in ~./zshenv. Depending on what's contained in your ~./bash_profile some items may be better suited to be placed in other zsh files like ~/.zshrc.
Install a zsh plugin manager
Software like oh-my-zsh can help enable more robust zsh configurations than the default zsh. You can install oh-my zsh with the following steps:
- Run the following to install ohmyzsh on your computer.
1sh -c "$(curl -fsSL https://raw.github.com/ohmyzsh/ohmyzsh/master/tools/install.sh)"Visit https://ohmyz.sh/ for the latest installation instructions.
- After successfully installing oh my zsh you may see the following confirmation in your terminal
1Cloning Oh My Zsh...2Cloning into '/Users/monica/.oh-my-zsh'...3remote: Enumerating objects: 1210, done.4remote: Counting objects: 100% (1210/1210), done.5remote: Compressing objects: 100% (1175/1175), done.6remote: Total 1210 (delta 20), reused 1096 (delta 15), pack-reused 07Receiving objects: 100% (1210/1210), 843.85 KiB | 9.48 MiB/s, done.8Resolving deltas: 100% (20/20), done.9
10Looking for an existing zsh config...11Found ~/.zshrc. Backing up to /Users/monica/.zshrc.pre-oh-my-zsh12Using the Oh My Zsh template file and adding it to ~/.zshrc.13
14         __                                     __15  ____  / /_     ____ ___  __  __   ____  _____/ /_16 / __ \/ __ \   / __ `__ \/ / / /  /_  / / ___/ __ \17/ /_/ / / / /  / / / / / / /_/ /    / /_(__  ) / / /18\____/_/ /_/  /_/ /_/ /_/\__, /    /___/____/_/ /_/19                        /____/                       ....is now installed!20
21
22Before you scream Oh My Zsh! please look over the ~/.zshrc file to select plugins, themes, and options.23
24• Follow us on Twitter: https://twitter.com/ohmyzsh25• Join our Discord server: https://discord.gg/ohmyzsh26• Get stickers, shirts, coffee mugs and other swag: https://shop.planetargon.com/collections/oh-my-zsh- Check out the docs https://github.com/ohmyzsh/ohmyzsh/wiki to view some of the available themes and plugins.
Setup zsh-autosuggestions
zsh-autosuggestions is a plugin that add nice autocomplete functionality to zsh. Below are instructions for installing it as a plugin for oh-my-zsh to use.
- Clone Oh My Zsh repository into \$ZSH_CUSTOM/plugins
git clone https://github.com/zsh-users/zsh-autosuggestions \${ZSH_CUSTOM:-~/.oh-my-zsh/custom}/plugins/zsh-autosuggestions - Open
~/.zshrcand add the plugin to the list of plugins for Oh My Zsh to load inside of ~/.zshrc.
- Start a new terminal session and commands should now autocomplete based off of the history in ~./zsh_history` (which is added to every time you type a new command)

I am planning on cleaning up my ~./zsh_history a bit if I run into previous commands that had typos or misconfigure paths in order to ensure that autosuggestions isn't recommending my previous mistakes.
I am looking forward to learning more about the zsh ecosystem as so far I am enjoying the autosuggestions plugin and I've heard that the ecosystem has some nice functionality including how it recursively search files, spell checking and robust themes and plugin support.
This article was published on May 14, 2021.
